The one piece jigsaw (for ages 30+)

26 Apr

I felt it was time to buy another power tool.  I don’t know if I felt emasculated and felt the need to prove my man skills (it might be an Essex thing); I don’t know if I had a burning desire to buy a cheap power tool (I always do); I think it was actually my not trusting my hand sawing skills to cut out the wooden formwork needed for building the firebrick arches, and that somehow nothing could go wrong if I bought a jigsaw.  So I bought one, I think it cost less than £30, and for that money it came with a hoover attachment AND a guide for making parallel cuts (it’s wonky and can’t help with parallel cuts).

First step was to get 2 pieces of sturdy plywood, and fix them together – that way I only need to make one set of cuts, and the risk of producing two identical boards that were both different was avoided. That done, I laid the bricks out in the arch I needed, and began marking each brick.  I found the best way to mark the position was to butt the end of a ruler against the brick, move the brick slightly, and then draw the line in fully.

Cornish pasties: Chewy

Pencil and ruler discovered a hidden passage.

With the arch now marked, it was time to use the new toy and get cutting.  First step was to throw away the blades that came with the jigsaw – they were rubbish; no use to anyone unless cutting yogurt was your objective.  I used some sharp and shiny Bosch blades, tested them out on some scrap wood, then realised I was enjoying myself and found more scrap wood to cut. Put it this way: If Heather Mills-McCartney had been in the vicinity, she’d have suddenly thought she was walking with one foot in the kerb.

I propped the plywood up on bricks so that I had good clearance underneath, and then realised I had no idea how I was going to cut this.  I didn’t trust myself to start at one end and cut each section out, there’s no way that would have turned out half decent.

The solution was to extend the pencil line of each brick, and then come in with the jigsaw from the side.  This would allow me plenty of room to line up the blade and hopefully hit the mark dead on.

The land of the rising sun: flatter than most people expect.

All went well with cuts; no majorly wonky lines, just one bent up blade where I hit a supporting brick.  The amount of kickback from that was pretty hard, and somehow I didn’t knacker the arch cuts.

Final step in assembly was to separate the two boards, and then put some wooden spacers between – each spacer is around 15cm, allowing enough support for the bricks, and enough overhang for me to check how the bricks will sit against the previous arch brick.  For some reason I didn’t take a picture of the completed arch former in all its clean glory, so I’ll have to take one later and update this post.  One of you had better remind me, or it just won’t happen.

Finally I put the arch former on bricks and some wooden baton (knock the baton out, and the arch *should* drop down and leave the brick arch standing.  I then loaded the arch support with firebricks, added some spacers to stop them from slipping, and behold! This is what the arch should look like:

Probably not the safest place to teach your kids how to count.

Wheel of fortune: standards have slipped over the years

All that remains to be worked out now is how the hell I cement that in and keep it looking as neat.

I bless the rains down in Africa*

25 Apr

I’m back. Like the swallows and ospreys who migrate south for Winter and then return when our UK weather improves (the bloody wimps), I’ve made the return journey. Only I didn’t go to Africa. I didn’t migrate for the winter. I’ll be honest, I didn’t go any further than window sill bay. Around October I seemed to have something on every weekend, which meant no time to work on the BVO. Then winter started creeping in, and when I did have the spare time, the weather was against me, so the project was shut down for a few months.

Every couple of weeks I’d go and check it hadn’t fallen over/sunk into the ground/melted, and I’d be lamenting the fact that I couldn’t make any progress. The tarpaulin covered stack of firebricks, fireclay and fire cement (I could have simplified that with an equation actually: FIRE(cement, clay, bricks) ) sat there like the lousy kid who was always picked last for football at school.

I can’t just blame the weather for my lack of updates; I’d actually made progress with the arches, but had failed to re-scale the images and write something about them. So with the flowers coming out, the birds returned and filling my garden with lots of smaller versions of themselves, I’ve been given the impetus to get back blogging. (actually, it was the folks over at the UK wood fired oven forum who gave me the kick up the backside)

* As soon as I thought of Africa, that bloody song by Toto invaded my brain and won’t go away, so if I have to suffer it, so do you.

Walls of Jericho – the worlds first ice cream maker

20 Sep

Time to get those oven walls up.  Having never laid a brick in my life (apart from the slab blocks), I had no idea how long this would take, and more to the point, how much could I cock it up?  After much deliberation, I’d decided to lay the firebricks with a classic bond, rather than stand them on end, now I had to bite the 4.6kg brick shaped bullet, and get on with it.

Starbucks coffee: not very nice

First up, let’s open a tub of fire cement.  These tubs are 25kg each, and I really didn’t trust the metal handle to hold, so the less movement the better.  On opening the tub, I saw the unexpected – lots of brown liquid sitting on top of the cement.  My first thought was that I’d stored the tubs incorrectly, and that they needed to go in a fridge or something.  Nothing on the label said anything about storage, so since delivery, they’ve been stored outside, under a tarp.  It’s not been cold or excessively hot, so I was surprised.  Then it dawned on me – it’s air drying cement, so a layer of oil was added before sealing the lid.  Panic over. **EDIT/UPDATE: It wasn’t a protective layer of oil, it was a key ingredient of the cement that had separated whilst in storage.  Would have been nice if it said that on the container. From now on, I mix the cement each time I use it**

A quick prod around with a trowel, a brick under one side of the tub, and I’d drained the oil to one side, and was ready to begin laying the first brick.

Time for another moment of my surveyors brain hindering progress –  the first brick to go down has to be placed in the centre of the hearth width.  Nothing too hard about that, just measure the length of the brick, draw a line midpoint, and place it.  Oh no.  “What if some of the bricks are different lengths then?” shouted my devious mind.  Cue me measuring several bricks to double check this, and you know what?  They’re all the same length, give or take 0.5mm.  I drew the line at measuring the half mm…  Anyway, I slapped on some fire cement – it’s pretty easy to work with, sticks to the bricks and doesn’t run off.  One thing I had to consider was that it’s advised to have less than 5mm thickness of cement, and also I’d always wanted to dry lay the bricks, so wanted to keep as close to those rules as possible.  I used around 2-3mm or cement, as this was enough to adhere the brick to the hearth, and also gave enough play to level it.  Levelling the first few bricks was very important – got to keep the sides as vertical as possible, and the top as horizontal as possible.

The handtool sundeck proved to be very popular

The first brick went down fine, then it was just a case of dry-placing the next brick, judging how much cement would be required to level it up and adhere bricks side by side.  Progress was a lot faster than I thought it would be actually, it didn’t take long to get a rhythm going, and I found it pretty enjoyable actually.  Essential tools for this task – Rubber mallet, pointing trowel, small level, long straight edge/level, carpenters square (for when turning corners).  Finally, I put several sheets of newspaper down on the hearth area that would be seen (if you looked into the back of an oven), in case any cement dropped or spilt, and stained the hearth – especially as there is an element of oil present in the cement tub.  Sods law says that all my being precious about an immaculate hearth, and I make a mess of it with spilt cement and oil. When putting the cement on the brick, I made a few notches in it, so as to aid adhesion.  The cement dries pretty quickly, so any excess that oozes out when tapped down, or the odd bit that was accidentally wiped onto the brick face had to be wiped away carefully.

As I’d found when laying the hearth, some of the bricks are not uniform in shape, so I had to make sure that any discrepancies, weren’t too huge.  I also decided not to point any gaps in, mainly because I wanted to get on and get all the bricks down, but also because I didn’t want to make a mess of the bricks.  It’s the inside of an oven, that will hardly be seen, but I’ll know it’s there, and it will play on my mind for God knows how many years.  There aren’t any gaps that run from front to back of the bricks, well, none that I can see, but I’ll point the rear face of the bricks, just in case.  I don’t want any of the hot gases from the fire escaping that quickly into the vermicrete insulation.  It doesn’t matter what the back of the bricks looks like, even I’m not that much of a OCD nut job.

For the back and sides, I only had to cut one brick, which meant less work, less errors, and less knackering of my diamond blade.  I filled the bucket up, made my marks on the brick, and then gave it a good soaking.  30 minutes later, I discover that there’s a hole in the bucket, and the brick was damp at best.  A quick plug of fireclay/sand mix (it was all I had to hand) and the brick was back soaking.  20 minutes later, time for the cut.  My inexperience/cack-handidness with using a large angle grinder meant that I had 2 halves of a brick, just slightly unequal halves.  Not to worry, I’ll use another brick, as I bought extra, and the spare bits will be used anyway.  The first brick, well soaked, cut ok.  I decided to see if a 5 minute soak would make much difference.  It does – took a lot longer to cut, and there were plenty of sparks.  Not sure if it made much difference to the blade, will have to see on the next cut.

Added a final brick to the top of the rear, as this will be the top of the roof arch.  I’m really pleased with the outcome – I’ve never done this before, and my measurement nazi-ism tendency paid off – the walls are level, the same distance across, give or take a couple of mm, and the brickwork looks pretty neat.  There are a couple of cement smudges along some courses, but I can live with that.  I think.

If you were a delinquent starling, you'd probably want to graffiti your name all over this

Construction porn: no one knows for sure how the pyramids were built

Communist era architecture: not always that grand

I started to get ready to cut my arch formwork, but the rain came, so that’s for the next post – you’ll have to wait for that, unless you find it available for illegal download somewhere.

Harry Potter and the chamber that can’t make it’s mind up

16 Sep

With the hearth complete, I thought it would be a good idea to have a final dry run of the oven walls, just to double check that everything fits.  Knowing how things can sometimes go a bit weird of their own accord, I really wouldn’t have been surprised to find that the hearth was smaller than I thought, and would only allow me to cook a sausage on it.

Ever since I took delivery of the firebricks and did my initial run, I’ve had it in my head that the oven wall bricks would all be standing on end, I think the phrase for that is ‘soldier’.  So as I’ve been building this oven, I’ve constantly visualised a row of bricks stood on end; soldier, soldier-  I had to stop there, as all I could picture was bloody Robson and Jerome, and if they think they’re getting an invite, they can think again.

It wasn’t until I saw a fellow forum member post pictures of his oven, that I suddenly realised that I might actually want to lay bricks flat.  After playing around with various options, I decided that I was going to lay the side and rear walls traditionally flat.  I’d recommend a final dry run before you start fixing bricks in place, it really does help with making that final decision.  It was also a really good opportunity to check levels, from side to side.  When I checked mine, it was consistently level, so suddenly my obsession with laying the hearth perfectly seemed like it wasn’t so OCD after all.  Below are various combinations of brick options, I also included a 50:50 layout that allowed me to compare flat laid bricks Vs soldier layed bricks.  In the end, the decision was aesthetic – I preferred the look of flat laid bricks.

The two teams of bricks eyeballed eachother for what seemed like ages

Swimming pools for hydrophobics: surprisingly quick to build

Oven clearly signalled that he was turning left


I laid out the bricks for the final time, decided that if I tried any more options I’d never make a decision, and did a quick brick count to make sure that I had enough fire bricks left.  I ordered enough, but you can never tell when the local cats have been playing tricks on you.

Less mysterious than Stonehenge

Apparently took this photo in space

The final dry run also had me thinking about any thermal weak points that the oven might have.  Granted, there’s  big hole at one end of it, but I was concerned that at the corners, I’d not got enough thickness of firebrick, and may lose heat through the corners.  A quick shift of the bricks, and the corners will be the last place that loses heat.


Whilst I had the walls up, I spent some time laying out a rough arch, as up to this point, I hadn’t a firm idea how wide the oven chamber would be.   Based on nothing scientific what so ever, I laid out an arch, and I estimate that each span will use 10 firebricks, and I’ll need 5 arches – I still have enough bricks.  The actual calculation of the arch is something that I’m a little apprehensive about – not because I think it will be a difficult task, but because at some point, my brain will pipe up with “hang on, there’s a mathematical way to solve this, it’s only an arc, a chord and a radius, it won’t take two seconds to solve”.  There, I’ve done it now.  Better dig out that scientific calculator, and a hammer with which to destroy said scientific calculator after 2 hours of trying to remember maths that I last used many years ago.

X marks the mishapen or damaged brick

Feargal Sharkey: “A good hearth these days is hard to find.”

16 Sep

I had 2 courses of firebricks to lay, and the hearth would be complete.  You’d have thought it would have gone quite easily, right?  Wrong, it took me bloody ages.  First off, and to blame someone or something and not me, it seemed that every brick I picked up and laid down wasn’t uniform in shape.  I now have a nice stack of trapezoidal firebricks, which I’ll be able to use in the walls, so whilst they’re not wasted, I did waste time.  The second delay was me being far too particular, something which I don’t think I’ll ever be able to stop.  So many times I looked back at a brick I’d fixed 3 bricks before, and all I could see was a raised edge that would have tripped a hyperactive toddler flat on their excited face.  The reality is that any raised edges between hearth bricks probably wouldn’t stop a small shrew, so the chances of it ruining every pizza cooking session would be remote.  Could I still cook a pizza on it? YES.  Could I slide a pizza peel or roasting dish over it? YES.  Would I be unable to sleep each night, knowing that the microscopic equivalent of a Mayan temple was sat in my garden? YES.  I really am my own enemy here, so a tip for anyone laying a hearth – try not to forget that you’re looking at the hearth very closely when laying your bricks, and that for centuries, people across the world have cooked fantastic food on an uneven hearth, and probably haven’t experienced the worst day of their life ever.

After several brick replacements, the hearth was complete.  A quick brush down and removal of excess fireclay, and it was looking good:

The corduroy lawn finishes off the oven perfectly

I’m pleased with the finished hearth-  it’s level, which is the main thing, as it means the oven brickwork that sits on top of it shouldn’t need to much fire cement to level each brick up.  I’m also pleased with it because it was a part of the build that I wasn’t looking forward to, and it went a lot smoother than I thought it would.  My initial plan was to bed the firebricks down with fire cement, but on reflection, this would have been a) expensive and b) an invitation for everything to go incredibly wrong.  Removing a brick once the cement has set will be something that’s probably near impossible to achieve, without destroying surrounding bricks

Sending Dorothy et al tripping up

1 Sep

Product placement: I'll not have it on my project

Time to start laying hearth bricks.  There was a certain amount of trepidation with this stage of the project, as I’ve seen so many example of really good brick work, that I felt obliged to ensure mine could have passed off for a Roman mosaic, and not the Devil’s causway.  My primary concern was that the bricks wouldn’t sit in a straight line along the length of the oven – any deviation here would be apparent, at least to my overly critical surveyors scrutiny.  I know that in a few weeks the hearth would be partially hidden from view beneath the oven roof and a layer of ash, but if I knew that the bricks didn’t run straight, then it would play on my mind.

The solution to this, I hope, was to fix a length of timber baton across the length of the slab.  This would ensure that as long as the bricks were butted up tight against it, the centre course of bricks would be pretty much straight.  A suitable length of timber was screwed down to the wooden casting formwork of the slab, and I made sure that the bricks would be butting up against the deepest side of the timber, so as to minimise any movement.  The timber followed the centre line that I’d already marked out, and I first drilled pilot holes before screwing the timber down, so as to reduce the chance of the baton moving as I fixed it.  If you’re not a regular user of drills, I suspect you’ll have experienced the frustrations of screwing timber down, only for the action of the screw biting into the wood to pull the timber off course slightly.

Spirit level was pinned in by the two bully levels

Using a small bricklayers trowel (He doesn’t know I have it, and as he’s small, he poses very little threat to me, as I’m pretty tall), I laid down a good 5-10mm of the clay mix.  Slowly lowering the first brick onto the mix and ensuring that it was butted tight to the baton, I then used a rubber mallet to gently tap it into place, avoiding the temptation to give it a bloody good whack and watch the clay mix squeeze out.  A word of caution – be very careful with a coloured mallet, as they can mark the brick. I carried out a test on the underneath of a brick, and it’s pretty easy to mark the bricks. Once I had the brick at a height I thought would be ok (I have nothing to base this on, just that I don’t want the mix to be too thick), I checked for level across the top (front to back and side to side).  It was perfectly level. Something must be wrong.  There’s no way that I got it spot on first time, is there?  Actually, I did.  I checked again, and then again with a different level, then checked that the thickness of the clay mix wouldn’t leave me unable to level a brick in other areas of the slab.  A quick tidy up of any spare clay mix, and also of the brick, and it was time to move on.  If the first brick was this easy, I should have the rest done in about 45 minutes.

Did I say 45 minutes for the whole lot to be done? 20 minutes later, and the second brick was finally level and plumb. At one stage I had the brick almost spot on, but that’s not good enough for me; a slight error at this end could be magnfied at the other end – think how the end of a triangle gets larger as the length of the side increases (hear that?  that’s the sound of a measurement obsessed surveyor working out how to avoid introducing a 1 second of arc error into a course of bricks).  Within the hour, I’d got my first course of 6 bricks down – all very level and plumb, and I was well chuffed.

Thanks mainly to the weather, I only managed to complete half the hearth (that sounds like a lousy ITV1 gameshow), so the remaining half will be completed next weekend.  It was a valuable learning experience – after a while I got into a rhythm of placing bricks, levelling and moving on.  There were some problems and issues, but nothing that didn’t take too long to work out:

  • The firebricks are not uniform in size – some are trapezoidal (I love that word, and rarely have the chance to use it correctly), others are uniformly smaller or larger than other bricks.  These differences are only a millimetre or two, but it’s enough to either skew the course of bricks, or create an obvious gap.  After a few of these, I found it best to check the brick for fit before even considering placing it.  I now have a nice collection of bricks with a large ‘X’ on them that can be used where the difference in dimensions is less of a problem.  I discovered some odd sizes once the bricks were in place, so they were replaced with better fitting bricks.
  •  It’s not too difficult to remove a brick that you’ve laid, even if it was a few bricks ago. I had one brick that I moved 90 minutes after laying, and it was a simple enough task.  This was only achievable when one side of a brick was exposed.  If the brick were surrounded by others, it would be hard to remove it.  I’m glad my base was fireclay and sand. I’ve heard that some oven builders also use cement, which once set, might make brick removal tricky. (picture below)
  • Be careful when placing the fireclay mix, and ensure that there is hardly any that can squash up between adjacent bricks.  It took me a few errors to work this one out, but I found that some bricks were sitting at an angle due to excess fireclay mix oozing up between it and the bricks next to it.  No amount of tapping can resolve this, so remove the brick and start again.  The way around this is to make sure that your fireclay mix is angled down to the adjacent brick – kind of like a pyramid.  When you’re placing your brick, apply as much sideways pressure as you can to minimise the risk of the fireclay mix getting between bricks. (picture below)
  • Make sure that your placed fireclay mix has lots of ridges – this gives the brick something to adhere too, and gives more room for adjustment.  A compacted mix is difficult to work with.
  • It’s easy to damage the bricks – be careful when placing bricks against other bricks, otherwise you may find yourself with rough edges. (picture below)
  • Pay attention to your brick lines – when you lay a new brick, check that it’s as straight as possible, so that your line of bricks is relatively straight.  I used a 1m level for this, and when adding a brick to the side of another (ie when starting a new course) I used a steel right angle to check alignment. (I know, I know, surveyor obsession…unrealistic…etc) (picture below)
  • If you have a gap that’s less than 2mm, it will eventually fill with ash.  No one will see it once the oven is complete.  It’s not something worth losing sleep over.
Anyway, here’s half the hearth completed, it’s very level, brick joins are level so very little chance of a pizza peel or ash scraper catching:

Just like a comparison of rival washing powders

The pallbearers ensured that the setting was suitably solemn


Brick burnt rubber as he got the hell outta there

DFS: Some of their sofas are just plain uncomfortable

level smiled as the bricks were put back in their place

Stale bread:good for toasting and not much else

construction porn: if you go blurry eyed, there's a ghost in this picture


No sign of Demi Moore, thankfully

1 Sep

The Sarlacc - a lot less scary in real life

When the tide goes out at Southend, this is what you'll see, except mine doesn't have sticks covered in tar


Time to knock up the hearth bedding mix.  1:1 fireclay and sand, mixed it dry, then kept adding water and mixing until it formed a consistent loose clay mixture throughout.  I hadn’t really any idea as to how wet or dry the mix should be, so there was an element of experimentation here. I did know that too wet or too dry, and the bricks wouldn’t bed down well.  After taking precise consistency and firmness measurements with my finger, I felt I had a mix that would support the bricks and my tamping them into position, but not have the bricks sinking through a too wet mixture, or not moving at all through a too dry mixture.

Hearth and soul

31 Aug

A week after pouring the upper slab, it was time to begin laying the hearth, so a bit of preparation work first.

The joke letterbox: breaking the hands of postmen for years

I marked out the centre lines of the slab, the important one being that which runs the length of the oven, as that will be my guide for laying out the hearth bricks.  Whilst marking the centre lines, I took the time to remove the thing layer of concrete that was covering the timber that formed the ash drop (I’ll remove the timber when the slab frame is removed).

The hearth is 12 bricks wide, and 6 long, so the long centre line has 6 bricks either side of it. My main concern is that I’ll start laying the hearth a row at a time, and not keep to a straight line….


Catching a roadrunner - simple

Originally, I’d planned to lay the hearth bricks on fire cement, but decided that this would be expensive, especially if/when I cocked it up and needed to rip it all up. So, after a bit of research, and time spent on the ever helpful Wood & Pizza Oven UK Forum, I settled on a 1:1 mix of sand and fireclay.  I bought 2 x 25kg bags of fireclay from Castree Kilns – very helpful, competitive price, and delivery charges were very reasonable.  True to form, the delivery driver felt the need to bitch mention that the packages were heavy. I think that a prerequisite of being a delivery driver is the ability to make the customer feel as if they are personally responsible for any perceived slight, injustice or inconvenience that the driver feels may have been made.


The fence watches my every move.

The new Absolut bottle design never got beyond the early approval stage

Before laying any bricks (I wonder what type of hens do that?  I must look it up), a final dry run was in order.  I knew that the slab was large enough for the hearth (ok, I’ll admit that there was a part of me that was expecting me to lay 4 bricks and run out of room, thanks to some obscure miscalculation).  This dry run was also a chance to see how level the slab was, and get an idea of any areas that would require a lot of fireclay/sand mix to bring it up to a level height.  Thankfully the slab was pretty level across the board – a couple of deviations, but nothing that would require enough clay to make a full set of crockery.  The final test was to put my level across the throat of the oven, and it was perfectly level – I was pretty chuffed with that.

Buried metal

23 Aug

Mrs Barrelvaultoven and I are getting fed up looking out of the kitchen window, and seeing a cement mixer taking pride of place in the centre of the back garden. Whilst it’s not in use, it’s wrapped up in plastic sheeting, which makes it look even more horrific, as the bottom half is covered in black damp proof membrane, and the top hidden from view by opaque plastic.  From a distance, it looks as if some try hard art student has installed a giant pint of Guinness that symbolises the proliferation of plastic refuse.  It’s time for it to go, and that means I have to complete the pouring of the upper concrete slab.

Home made Rice Krispie squares: not as good as the ones you buy in the shops

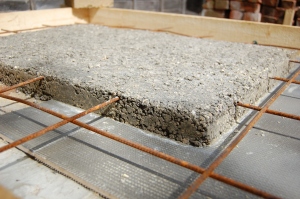
In my last post, I cast some vermicrete with reinforcement mesh embedded in it.  5 days on, and it’s set, although not rock solid, as the vermiculite is still slightly sponge like when prodded with a fingernail.  I removed the formwork – that took about an hour long than I thought it would, as I had to saw, cut and drill the wooden forms out, as they were wedged against the reinforcement. If I planned on using the formwork again, it will be perfect for toothpick manufacturing.  Once off, it’s held shape nicely and will provide a decent back up insulation layer within the upper slab.

Like a good bra, and unlike Arsenal, there's good support up front

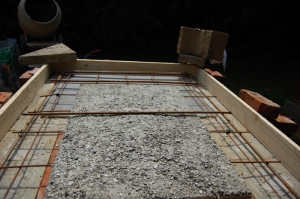
Before I could begin my final pour, I fixed 10mm and 12mm rebar along each edge (ensuring they were placed over the centre of the blockwork), and also positioned double width lengths (does that make any sense, double width lengths?) spanning the wood store.  This open end will also support the chimney, so it makes sense to add as much strength as possible here.
Brick and paving slab dared block to jump in.

The lengths of rebar were fastened with wire, so that when the poured concrete was being tamped down, they wouldn’t move – the worst thing that could happen is that I clumsily inadvertently dislodge a rebar and it pokes through the concrete, exposing it to moisture.  A final rebar was positioned across the centre, although the only load here will be directed through the side walls.

Brick practised his snooker at every opportunity

The mixer was brought into use one last time, knocking up batches of 5:1 concrete (all in ballast:cement). We took care to tamp between all the reinforcement, making sure that any gaps were filled.

Construction porn: If M&S were building this oven, you'd see a lot more photography like this

As has been the case from the start, I always need to make more concrete than I originally thought I would.  Thankfully I had ordered more all in ballast than I needed this time, so there were no last minute trips to B&Q or Wickes.  It turned out in the end that we’d made too much concrete, and had some surplus, but I’d rather this, than the other way around.

The bricks couldn't wait to go skating on the new rink

The last stage was actually the most time consuming – smoothing out the concrete.  As we did when pouring the foundation and ground slab, we moved a solid plank back and forth across the fresh concrete, which smoothed it down and ensured that we had a level finish across the slab.  We found that the all in ballast I’d bought this time (from a different supplier) was slightly larger and less rounded, which meant that as we moved the board back and forth, it picked up stones and left small holes.  I like to think that Dad and I set the record for most expletives uttered at a concrete slab.  Eventually we finished, and despite the introduction of a fine mist of water to keep the concrete wet, it was still drying rapidly in the sun.  One final spray, and out came my new float.  Somehow I didn’t manage to a) drag the float deeply across the fresh concrete, and b) fall face first into the fresh concrete, leaving me with a pretty smooth surface.  There are a few imperfections, but they’ll be no trouble (kiss of death, they’ll be a right pain in the rear) when laying the hearth bricks onto a sand/fireclay bed.  At the end of the day I gave the slab another fine mist coat of water, checked that no berries or cats had fallen into it, and cleaned the mixer up, ready to be collected.  It’s nice to be able to look all the way down my garden now. And see a wooden pallet resting against a tarpaulin covered pile of fire bricks.

Thermal underpants

16 Aug

As I was making good time this weekend (well, Friday-Monday, as I’d taken time off work to make progress on the oven), I was in a position to pour my vermiculite/cement slab.  One slight problem: I was too ahead of myself and hadn’t bought any Vermiculite.  Luckily a mate of mine is building a cob oven, and had a spare 100 ltr sack (that’s quite poignant actually, but he doesn’t like to boast about that) so I could continue with the build.  I need to span the gap that will be the wood store roof, and had originally considered maing formwork from a sheet of plywood, but then decided that if I could insulate that area better, I should do.

I've tried, but there is nothing remotely amusing that can be said for Aquapanel. Poor show by the manufacturer, 2/10 (see me after the lesson)

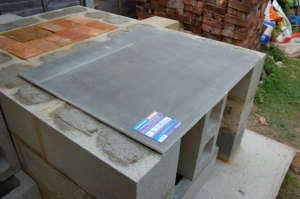
I popped down to Wickes to pick up a sheet of Aquapanel Thermal.  It’s a sheet of foam, sandwiched between a layer of cement bonded with fibre glass stands, so it’s pretty strong stuff.  Not only that, but it has the following properties:

– Fire resistance to Class 0 (I have no idea, hope it’s not petrol) and is non-combustible (phew)

– Very strong even when wet

– Ideal for use in walling in moist areas (or an outdoor oven)

– Can be cut with a knife or a fine toothed saw.

– Lightweight at on 14.6 kg/m2

I had to cut the sheet to size, and make a patch job so that I had plenty of overlap with the edges of the supporting wall.


Wheelbarrow never misses an opportunity to lean into someone else's photo

You might think that's a burial shroud around the edge. It's not.

The original TRON lightbikes stage set was rubbish


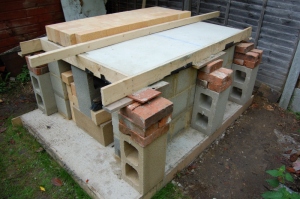
I then built a 2″ high frame that will contain the vermicrete back-up insulation layer.  As long as it insulates the bulk of the over, I’ll be happy that it’s a little less heat lost under the oven.  With that in place, we attempted to built a 4″ frame for the main slab, that sits around the back up insulation.  The timber that I’d bought had warped along the long edges; it was stored laying flat-ish overnight, in a dry shed, so I’m not sure if it was like then when I bought it.  We really had to wrestle with the frame to get it into position, and found the only way to keep it level(ish) was to weight the corners down.  The paper towel that you see on the edges is an attempt to dampen the timber, in the hope that it will straighten out a little.

We cut reinforcement mesh to size, ensuring that the edges were a good 2″ away from the edges, so as remove the risk of damp penetration corroding them.  The insulation frame had to have notches cut in, so that the mesh is embedded within the vermicrete.

You could sell this at a massive profit to your local idiot, telling him it's 'precious metals'

I really don't fancy the vegetarian alternative

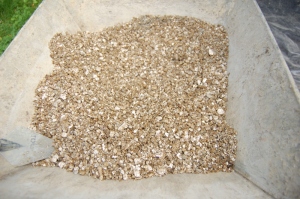
I’d read so many different methods for making Vermicrete – some suggest chucking the dry ingredients into a mixer and then adding water, others say this is the worst idea you could ever possibly have.  In the end, I followed a suggestion from the Wood  & Pizza Oven UK Forum of soaking the vermiculite. I decanted the 100 ltr sack into 2 construction rubble bags, and sprayed with a lot of water, then left it for 24 hours.  Now the mixing.  I figured that as the damp vermiculite was a bugger to get off my hands, it stood a good chance of sticking to the mixer, and as I didn’t fancy cleaning that for an hour, I used the wheelbarrow.  The vermicrete would be a 5:1 mix of vermiculite: cement.  The first mix involved making a cement slurry in a bucket, then gradually introduce to the vermiculite.  It was a lot of work mixing it, but the end result was ok.  The second method was to dust the vermiculite with the cement, mix it up well, then add water.  This was easier to mix, and seemed to make a much more evenly coated and manageable vermicrete.


There's nothing worse than a cheap Rice Krispie cake


Surrounded by the bricks, Vermicrete knew that his time was up

We shovelled 50 ltr of vermiculite/cement mix into the frame, ensuring that it was tamped down (Not to hard though, don’t want to compress the insulation too much) and that it was pushed underneath the reinforcement mesh.  We then levelled it off, and now we’ll have to wait and see what it comes out like.

There’s not going to be much direct weight on the vermicrete, that will be on the sides of the main slab.